how to use ftp
This tutorial was made with WSFTP LE, but the same basic principles apply to any FTP program. You'll just need to find the place to plug in the information and all will be well.
This tutorial also assumes that this is your FIRST time using the program. If this is not the case and you just need a refresher course in FTP, just skip steps one and two of the tutorial.
step one : create your profile
NOTE: This step is only necessary the FIRST time you use your FTP program.
And isn't that good news? ^_^
Of course, you can't do anything if you don't open the program. So fire that sucker up.
If you're using WSFTP, you'll get a Session Properties window. Press the NEW button on the right side of that window. That will give you a blank slate to work with.
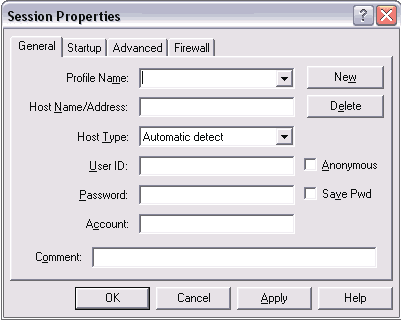
This LOOKS intimidating but I swear it's not. Just fill in the information like so...
Profile Name:
Call this whatever you like, this is YOUR name for your FTP connection.
Host Name/Address:
ftp.clavis-sama.com
Host Type:
Leave this on "automatic detect."
User ID:
The username you selected when applying for hosting. If your subdomain is fishy.clavis-sama.com then your User ID is fishy. No capital letters!
Password:
The password you chose when applying for hosting. You can check the "Save Pwd" box next to this if you want the program to remember your password the next time you use it.
So let's fill it out...
I'm using Goddess Neptune's login as an example here. Be sure to fill in YOUR information.
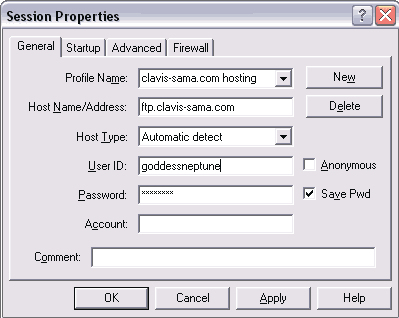
Now click the OK button at the bottom of the window.
You've finished this step!
step two : getting ready to upload
NOTE: This step is only necessary the FIRST time you use your FTP program.
See, it's not that painful.
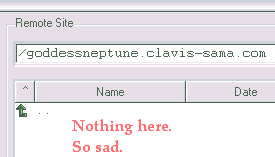
The Session Properties window will disappear, and you'll be left with something similar to the screen below. CLICK the image to see the full-screen version - the image below shows only a small part of the window!

Notice that there's a folder starting with "goddessneptune" on the Remote Side half of the screen. That's where your files will need to go. Of course, your folder will start with YOUR username. ^_^
To get into that folder, just double click it like normal. If you've never uploaded anything before, it will look completely blank like this.
Look at the left side of the screen, at the Local System window. This is the hard drive of your computer. You'll have to navigate around and find the place where you saved your website files. Once you find that place, STOP! Let's do something really important that makes it so you'll NEVER have to find your files again!
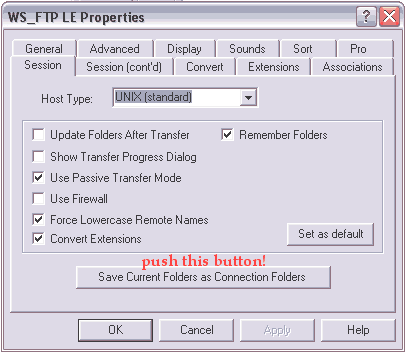
Look at the very bottom of the program window. There's a row of buttons there... Close, Cancel, LogWnd, Help, Options, About, Exit. Click the Options button!

This will bring up the Options window. Don't worry about all the other stuff now. We're only interested in that big button at the bottom, Save Current Folders as Connection Folders. This lets the program remember the right folder on both your hard drive AND on your webspace, which will save you time later. Push it!
Now hit the OK button at the bottom. You're ready to start uploading!
step three : upload your files
NOTE: This is the step you'll do every time. But it's the easiest!
Hooray! ^o^
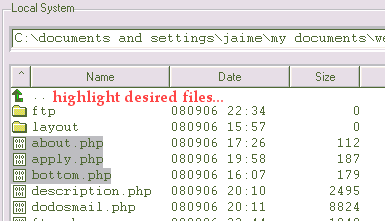
Now all that's left to do is to upload your files! It's very easy. All you do is look on the Local System side and find the files you want to upload. Highlight them just like you would when managing files on your hard drive.
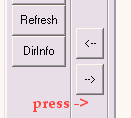
Find the arrow buttons between the Local System and Remote Side windows and press the -> button. It's pointing FROM your hard drive and TO your webspace, which is exactly how the files will go. Try it!
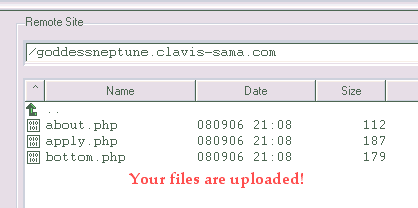
The program may pop up a progress window showing the file being uploaded. Don't worry. Just wait until everything stops and look what's happened.
There you have it! That wasn't so hard, was it? ^_^